Hierarchical Data Grid View Select Row
GridView
Move Over DataGrid, There's a New Grid in Town!
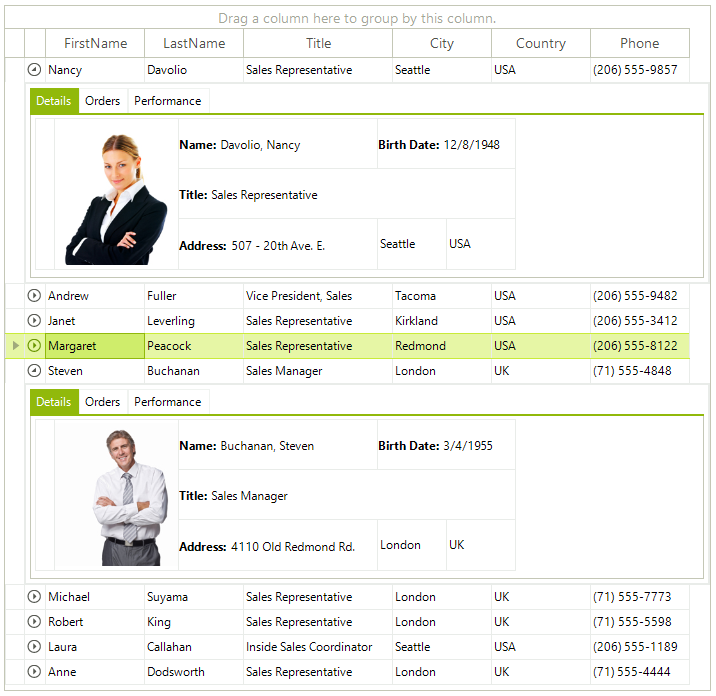
The Kettic DataGridView Control offers the hierarchical data structure support, which is able to display hierarchical master-detail data. This grid component allows UI designer process the hierarchical data at design time as well as in run time with the C# API included in the grid control.
Dino Esposito
This article is based on the May 2004 Technology Preview of ASP.NET 2.0. All information herein is subject to change.
This article discusses:
| This article uses the following technologies: ASP.NET, ASP.NET 2.0, C# |
Code download available at:GridView.exe(124 KB)
Contents
GridView Versus DataGrid
GridView and Data Source Controls
The GridView Object Model
GridView Events
Displaying, Sorting, and Paging
Editing Data
The DetailsView Control
The FormView Control
Conclusion
Despite the richness and versatility of its programming interface, the ASP.NET 1.x DataGrid control requires you to write a lot of custom code to handle common operations such as paging, sorting, editing, and deleting data. For example, while the DataGrid control can raise events when the user clicks to save or cancel changes, it doesn't offer much more than that. If you want to store changes to a persistent medium, such as a database, you have to handle the UpdateCommand event yourself, retrieve changed values, prepare a SQL command, and then proceed from there to commit the update.
The reason the DataGrid control limits the raising of events for common data operations is that it's a data source-agnostic control that can be bound to any data object that is enumerable. Implementing data operations such as update or delete would require a direct link with one particular data source. In ASP.NET 1.x, you work around this limitation by writing ADO.NET code that is specific to your application.
ASP.NET 2.0 enhances the event fires. By handling the event, you can check some conditions and optionally cancel the event by setting the Cancel property to true. For example, the code snippet just shown cancels the transition to the new page if the current user is not authorized to view pages with an index greater than 4.
Displaying, Sorting, and Paging
A grid is often used to display the results of a database query. This is easier than ever with the GridView control. You set up a data source object, provide the connection string and query text, and assign the ID of the data source to the DataSourceId property of the GridView. At run time, the GridView automatically binds to the source and generates appropriate columns of data. By default, all the columns in the query are displayed in the grid.
Like the DataGrid control, the GridView supports custom column fields through the Columns collection. If you want to display only a subset of the retrieved data fields, or if you just want to customize their appearance, you can populate the Columns collection with objects that represent columns of data to display. The GridView supports a variety of column types, including the new checkbox and image column types:
Figure 9 shows a grid in action configured to use the fields listed in this code. The names of the GridView column classes differ slightly from the names of corresponding classes in the DataGrid interface. Basically, the suffix 'column' is replaced with the suffix 'field.' Aside from this name change, the behavior of matching column classes is nearly identical. Some of the new column types save you from continually using templates. For example, the CheckBoxField column renders the specified data field using a checkbox, while the enhanced HyperLinkField column provides a long-awaited feature—support for multiple URL parameters. As in the code snippet just shown, the DataNavigateUrlFields property accepts a comma-separated list of field names and merges them with the text of the DataNavigateUrlFormatString property.
Figure 9** GridView with Fields in Action **
Note the difference between ButtonField and CommandField. Both columns add a button to the user interface of the grid, but a CommandField displays command buttons to perform select, edit, insert, or delete operations. A ButtonField simply represents a field that is displayed as a button. Finally, the GridView can embed images through the ImageField column type.
Figure 10 shows the ImageField column in action on the photo field of the Northwind Employees table. It is interesting to note that ImageField uses the ASP.NET 2.0 DynamicImage control to display images from both databases and URLs. Furthermore, when in edit mode the ImageField column pops up a Browse button so you can locate a new file on the local machine to upload.
Figure 10** Image Field Column **
Template columns are supported as well and require syntax similar to that of a DataGrid in ASP.NET 1.x:
It is interesting to note the more compact syntax fors hard to imagine the need for a brand new grid control like the GridView. Sure, you can now bind data source controls to the GridView with little or no code, but does this necessitate a replacement for the DataGrid? If it doesn't, consider sorting and paging.
In the GridView control, autoreverse sorting and paging are enabled simply by turning on the AllowPaging and AllowSorting properties. If you have ever tried this in ASP.NET 1.x, you're beginning to get the picture.
Figure 11** Pageable Sortable Grid in Action **
Figure 11 shows a pageable and sortable grid. The complete code for this grid is shown in Figure 12. (It is worth noting that the C# code is needed only if you want to add the glyph to the column header to indicate the sort direction.) So, sorting and paging work quite well without writing any code of your own. You control the data retrieval mode of a SQLDataSource through the DataSourceMode property. Feasible value types are DataSet (default) and DataReader. Data source controls may optionally cache the results of the SELECT command all the time when the DataSourceMode is DataSet. This enables rich GridView scenarios in which the control can offer codeless sorting, filtering, and paging capabilities. Caching is disabled by default and therefore must be enabled on the data source control.
Figure 12 Pageable and Sortable Grid
Caching data in memory can dramatically increase performance, but remember that the data is then somewhat vulnerable. You'll have to decide if the trade-off is worth it because the Cache object automatically discards least-used data if the system runs low on memory. In addition, in ASP.NET 2.0 the SQLDataSource control may optionally establish an automatic dependency with the database so that any change is promptly detected. This ensures that fresh data is always displayed. For more information on the features of data source controls, see my June 2004 article that I mentioned earlier. When the SQLDataSource control retrieval mode is DataReader, data is retrieved using an IDataReader object, which is a forward-only, read-only firehose-style cursor.
Editing Data
Amazing amy doll manual lymphatic drainage. So, cool, MLD is a legitimate modality.
One of the most important shortcomings of the DataGrid—and conversely one of the major strengths of the GridView control—is the ability to of handle updates to the data source. When the bound data source supports updates, the GridView can automatically perform data operations, thus providing a real solution right out of the box. The data source control reveals these abilities through a number of Boolean properties such as CanUpdate, CanDelete, CanSort, and so forth.
For a GridView control, editing data means in-place editing and record deletion. As mentioned, in-place editing refers to the grid's ability to support changes to the currently displayed records. To enable in-place editing on a GridView, you turn on the AutoGenerateEditButton Boolean property:
When the AutoGenerateEditButton property is set to true, the GridView displays an additional column that looks like the leftmost column in Figure 13. Clicking the Edit button for a row puts that row in edit mode. When a row is in edit mode, each bound field in the row that is not read-only displays the appropriate input control, typically a TextBox. When you click to update, the GridView raises the RowUpdating event and checks the CanUpdate property on the data source. If CanUpdate returns false, an exception is thrown. Otherwise, a command object is created and configured after the UpdateCommand property of the data source object.
Figure 13** Edit Column in GridView **
Your involvement with SQL is limited to defining the structure of the command—you just define statements and the control does the rest. There's no need to work with ADO.NET or worry about commands or connections. To persist changes when the user clicks Update, write code like this:
The UpdateCommand attribute of the data source is set to the SQL command that the GridView will use. You can use as many parameters as needed. If you take the time to use a particular naming convention, parameter values are automatically resolved. Parameters that represent fields to update, such as firstname, must match the name of DataField property of a grid column. The parameter used in the WHERE clause to identify the working record must match the DataKeyNames property, which is the key field for the displayed records. Finally, consider that if UpdateCommand isn't defined, CanUpdate returns false and an exception is thrown if you try to submit changes. The completion of an update command is signaled by the RowUpdated event. The number of rows updated by the execution of the update command can be retrieved in the AffectedRows property of the RowUpdated event arguments.
The GridView automatically collects values from the input fields and populates a dictionary of name/value pairs that indicate the new values for each field of the row. The GridView also exposes a RowUpdating event that allows you to modify the values being passed to the data source object. In addition, the GridView automatically calls Page.IsValid before invoking the Update operation on the associated data source. If Page.IsValid returns false, the operation is canceled. This is especially useful if you're using a custom edit template that includes validators.
A similar pattern occurs for the deletion of a row. The following SQL command is valid content for the DeleteCommand property of a data source object:
Note that the delete operation fails if the record can't be deleted due to database-specific constraints. For example, the record can't be deleted if child records refer to it through a relationship. In this case, an exception is thrown.
The GridView control doesn't have automatic support for inserting data into a data source. The missing feature is entirely due to the GridView implementation and doesn't depend on the capabilities and characteristics of the underlying data source. The data source object, in fact, provides a CanInsert property and supports an InsertCommand property. Note that a combination of GridView and DetailsView controls enables you to achieve this functionality, as you'll see in a moment.
The DetailsView Control
Many applications need to work on a single record at a time. In ASP.NET 1.x, there is no built-in support for this scenario. Creating a single record view is possible but requires some coding effort on your part. You have to fetch the record first, then bind its fields to as no need to handle the SelectedIndexChanged event if you want to build a master/detail view. You can drop a GridView and a DetailsView control on the page and bind each to a data source. The trick for codeless master/detail is to bind the detail control to a data source represented by the currently selected record, as shown in the following:
The FilterExpression property of a data source object defines the WHERE clause for the base query specified by SelectCommand. Parameter values can be specified in a variety of ways, including through direct binding with a control property. The <ControlParameter> object sets the @customerid parameter to the value stored in the SelectedValue property of the master grid control. The code in Figure 14 shows the configuration of the master grid and the detail view controls. Figure 15 shows the page in action. Note that no program code was required to achieve this.
Figure 14 Configuration of the Master Grid
Figure 15** Master Grid in Action **
The FormView Control
FormView is a newt supply advanced editing features like foreign key field dropdowns. However, by using templates you can easily provide this functionality. Two functional aspects mark the difference between FormView and DetailsView. First, the FormView control has ItemTemplate, EditItemTemplate, and InsertItemTemplate properties that the DetailsView lacks entirely. Second, the FormView lacks the command row, a toolbar on which available functions are grouped. Unlike the GridView and DetailsView controls, the FormView has no default rendering of its own. At the same time, its graphical layout is completely customizable using templates. Therefore, each template will include all command buttons needed by the particular record. The following code snippet shows the typical code you write to embed a FormView in your pages.
Figure 16 illustrates a page that uses a FormView control. The Edit button is added using an <asp:Button> element with the Edit command name. This will cause the FormView to switch from read-only to edit mode and display using the EditItemTemplate, if any is defined. A command name of New will force the control to change to its insert mode and render the contents defined for the InsertItemTemplate. Finally, if you add a button with the Delete command name to the item template, then the FormView invokes the Delete command on the data source when the user clicks it.
Figure 16** FormView Control **
How do you retrieve values to update or insert a record? You use a new data binding keyword—Bind—specifically designed for two-way binding:
The Bind keyword works like Eval to display data and can retrieve the value you've entered when updating or inserting a record. In addition, Bind is very useful in TemplateFields used in the GridView and DetailsView.
Bind stores the value of the bound control property into a collection of values that the FormView control automatically retrieves and uses to compose the parameter list of the insert or edit command. The argument passed to Bind must match the name of a field in the data container. For example, the textbox in the last code snippet provides the value for the notes field. Finally, bear in mind that the edit and insert templates must contain buttons to save changes. These are ordinary buttons named Update and Insert to save and Cancel to abort.
FormView's events work the same way that DetailsView's and GridView's do. So if you need to do more sophisticated things like pre- or post-processing data (for example, filling dropdowns) then you should write appropriate event handlers for ItemCommand, ItemInserting, ModeChanging, and the like.
Conclusion
Data-bound controls are an essential part of most, if not all, Web apps. Data-bound controls should be simple and powerful. Ideally, they should provide advanced features in a few clicks and use a limited amount of code. Although ASP.NET 2.0 is still in the works, its new generation of data-bound controls meet this requirement. The key shortcoming of ASP.NET 1.x data binding was that it required too much code for common data operations. This has been resolved with the introduction of data source objects and the GridView control. The DetailsView and the FormView are the perfect complement to the GridView and represent an important improvement to the ASP.NET 1.x data toolbox.
Dino Esposito is an instructor and consultant based in Italy. Author of Programming ASP.NET and Introducing ASP.NET 2.0 (both from Microsoft Press), he spends most of his time teaching classes on ADO.NET and ASP.NET and speaking at conferences. Reach Dino at cutting@microsoft.com or join the blog at http://weblogs.asp.net/despos.